Imagine stepping into your garden and hearing cheerful chirps from delighted birds enjoying a snack from your charming teacup bird feeder. This isn't just a dream; it's a delightful reality you can create with your own hands.
You might wonder, why a teacup? Because it's whimsical, unique, and adds a touch of elegance to any garden setting. With a bit of creativity and some simple materials, you can transform a humble teacup into a delightful haven for your feathered friends.
Get ready to dive into this rewarding DIY project that promises not only to beautify your outdoor space but also to attract and nurture local birdlife. Are you ready to unleash your creativity and make your garden the envy of the neighborhood? Let's get started!
Materials Needed
Creating a teacup bird feeder is a fun and simple DIY project. It's an artistic way to attract birds to your garden. Before starting, gather all necessary materials. Each item plays a crucial role in crafting a beautiful and functional feeder.
Teacup And Saucer
A teacup and saucer form the base of the feeder. Choose durable materials like porcelain or ceramic. Ensure the teacup is big enough to hold seeds. A matching saucer adds aesthetic appeal.
Strong Adhesive
Use strong glue to attach the teacup to the saucer. Waterproof adhesive is ideal for outdoor use. It ensures the feeder withstands weather conditions.
Metal Or Wooden Pole
A sturdy pole supports the feeder. Metal or treated wood are good options. The pole should be tall enough to keep birds safe from predators.
Drill And Bits
A drill creates holes for the pole. Use bits suitable for ceramic or wood. Ensure the holes fit snugly for stability.
Paint And Brushes
Paint adds color and protects the materials. Choose non-toxic paint safe for birds. Use brushes for detailed designs.
Bird Seeds
Bird seeds attract various species to your feeder. Choose seeds popular with local birds. Keep seeds dry to prevent mold.
Gathering these materials ensures a smooth crafting process. Enjoy watching birds flock to your handmade feeder.

Choosing The Right Teacup
Picking a charming teacup is crucial for crafting a DIY bird feeder. Opt for sturdy, weather-resistant materials. Ensure the size accommodates bird seed while attracting feathered friends.
Creating a teacup bird feeder is not just a delightful craft; it's an opportunity to bring a touch of whimsy to your garden while supporting local birdlife. However, choosing the right teacup can make all the difference in both aesthetics and functionality. Whether you're rummaging through thrift stores or repurposing forgotten treasures from your cupboard, the perfect teacup can transform your feeder into a charming garden centerpiece.
Consider The Material
A teacup's material affects its durability and weather resistance. Porcelain teacups are elegant but can be fragile. Ceramic and bone china are more durable options. If you live in an area with harsh weather, consider choosing a teacup that's less prone to chipping or cracking.
Size Matters
The size of your teacup will determine how much birdseed it can hold. A larger teacup can accommodate more visitors but might be heavier once filled. Are you ready to have a flock in your backyard, or do you prefer a more intimate setting? Think about the types of birds you want to attract and select a size accordingly.
Color And Pattern
The color and pattern of a teacup can influence its appeal to birds—and to you! Brightly colored teacups may attract more attention from feathered friends and add vibrant pops to your garden. If you love classic elegance, a teacup with intricate floral designs might be your preference. What speaks to your style and complements your outdoor space?
Handle Position
The position of the handle can impact how you hang the feeder. A sturdy handle makes it easier to suspend the teacup securely. It’s crucial to ensure that your hanging method won't tilt the teacup, spilling seeds all over the ground. Do you have a reliable way to hang your feeder safely?
Personal Touch
Your choice of teacup can reflect your personality. Maybe you have a teacup gifted by a loved one or a vintage piece with a story. These personal touches add sentimental value to your project and make it unique. Is there a teacup that holds special memories for you? Choosing the right teacup is more than just a decision—it’s a chance to create a feeder that is both functional and a reflection of who you are. Ready to find the perfect teacup for your bird feeder? Let your creativity soar!
Preparing The Teacup
Crafting a teacup bird feeder is a charming DIY project. Begin by selecting a sturdy teacup and saucer, ensuring they are clean. Attach the teacup to the saucer using strong glue, creating a beautiful feeder for garden birds.
Preparing the Teacup Creating a charming bird feeder from an old teacup is a delightful project. It combines creativity with functionality, offering birds a unique dining spot. Before you begin assembling, it's crucial to prepare the teacup properly. This ensures the feeder is durable and safe for your feathered visitors. Let's dive into the essential steps needed to get your teacup ready.
Cleaning And Drying
The first step is to thoroughly clean your teacup. This removes any dust, stains, or residue that might be present. Use warm soapy water and a soft sponge for the best results. Avoid abrasive materials to prevent scratches. Once clean, rinse the teacup well and dry it completely. A damp teacup can cause adhesive issues later. You can use a soft towel or air dry it on a rack. Is there anything more satisfying than seeing a sparkling clean teacup ready for transformation?
Drilling A Hole
Drilling a hole might sound daunting, but it's simpler than you think. Place the teacup on a stable surface and mark the spot you need to drill, usually the center of the cup's bottom. Use a ceramic drill bit for a smooth cut. Steady your hand and apply gentle pressure while drilling. Patience is key here to avoid cracking the porcelain. Did you know that taking short breaks while drilling can help prevent overheating and ensure a neat finish? Once the hole is drilled, you’re one step closer to assembling your teacup bird feeder. Have you ever considered how a simple teacup can transform your garden into a bird haven?
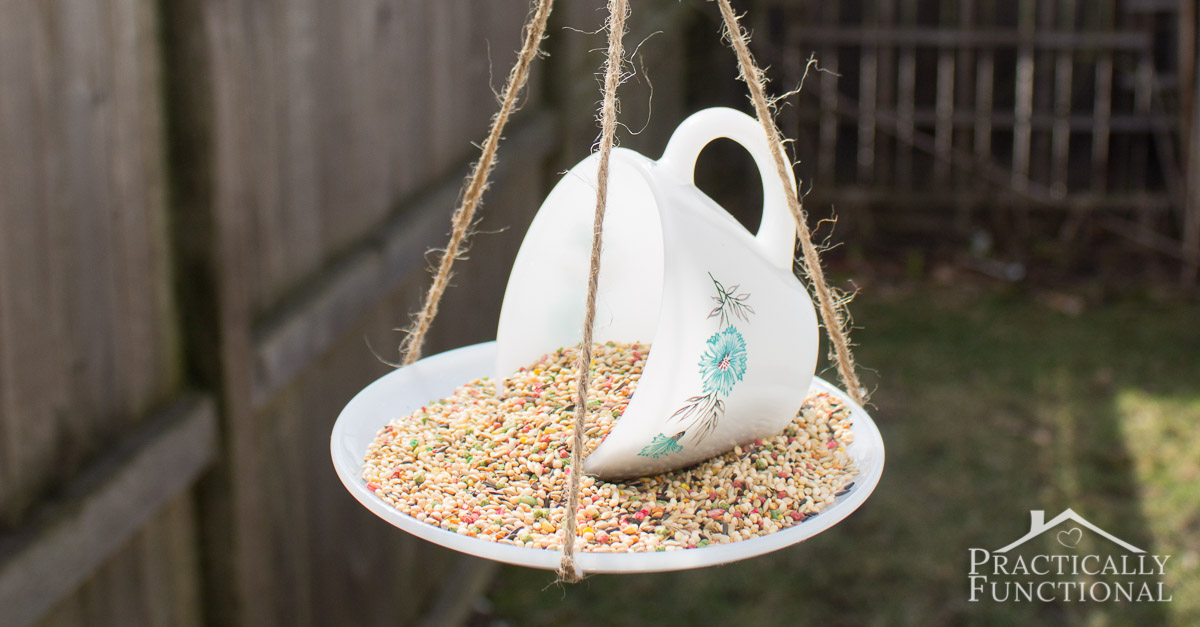
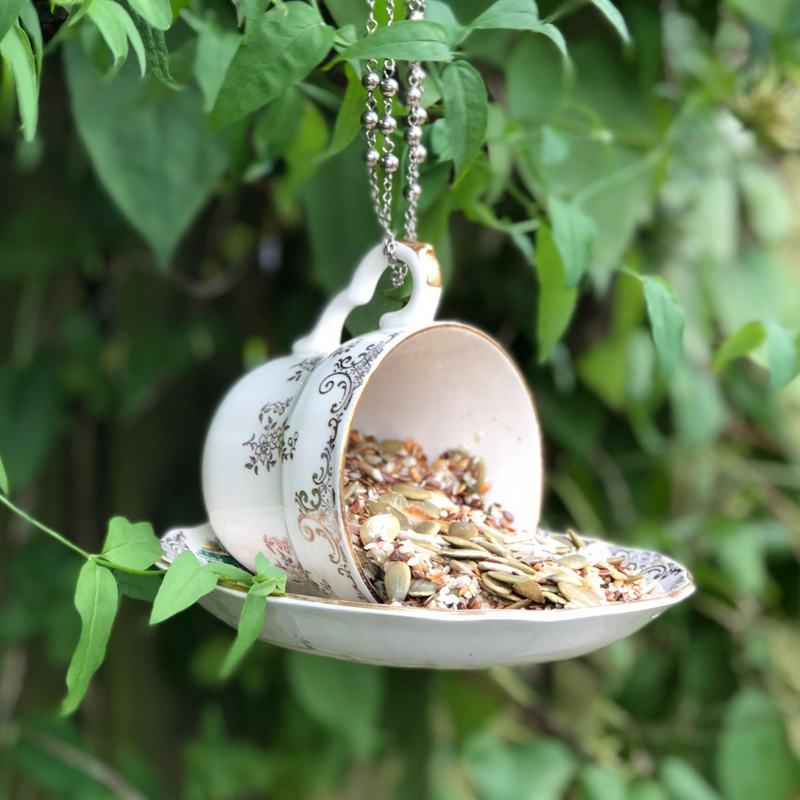
Assembling The Bird Feeder
Creating a teacup bird feeder is a delightful project that adds charm to your garden and attracts feathered friends. The process of assembling this unique feeder is simple and rewarding. Whether you're an experienced DIY enthusiast or a curious beginner, you'll find joy in putting together your own teacup bird feeder.
Attaching The Saucer
The saucer serves as the base of your bird feeder. Begin by ensuring both the teacup and saucer are clean and dry. This helps to create a strong bond when you attach them. Use a waterproof adhesive to secure the teacup to the center of the saucer. A hot glue gun can also work well for this task.
Hold the teacup in place for a few minutes to allow the glue to set. If you're like me and want to test its sturdiness, gently lift the saucer to see if the teacup remains attached. You don't want your creation to tumble over with the weight of birdseed. Have you ever thought about how a small adjustment can make a big difference?
Securing The Hanger
With your saucer and teacup firmly attached, it's time to add the hanger. You can use strong twine, wire, or a chain. Whichever you choose, ensure it's durable enough to withstand outdoor conditions. Cut the material to your desired length, keeping in mind where you intend to hang your feeder.
Attach the hanger securely to the saucer's edge or directly to the teacup handle. Test its balance by holding it up. If it tilts too much, adjust the placement until it's steady. Once your hanger is secure, imagine the anticipation of watching birds flock to your handmade feeder.
As you assemble your bird feeder, consider the unique charm it will bring to your garden. Each step in the process not only builds a feeder but also creates a personal connection with nature. What's one thing you've assembled that brought you unexpected joy?
Decorating Ideas
Create a charming teacup bird feeder with simple items from home. Attach a teacup and saucer to a sturdy pole or hang them with strong wire. Fill the cup with bird seeds to attract colorful feathered friends to your garden.
Creating your own teacup bird feeder is not just about functionality; it's a fantastic opportunity to express your creativity. Once you've assembled your feeder, the next step is to make it uniquely yours. Decorating it can be as simple or elaborate as you want, and it's a wonderful way to add a personal touch to your garden. Whether you're aiming for a whimsical look or something more classic, these decorating ideas will inspire you to craft a feeder that stands out.
Painting The Teacup
A splash of color can transform your teacup bird feeder into an eye-catching garden feature. Consider using outdoor acrylic paints, which are durable and weather-resistant. Think about a color scheme that complements your garden. Bright colors like red or yellow can attract birds, while pastel shades offer a more subtle appeal. You might enjoy painting patterns like polka dots, stripes, or even tiny flowers. Tip: Use stencils for intricate designs if you're not confident in freehand painting. Painting is a fun activity to do with kids. They can add their own creative flair, making the feeder even more special.
Adding Embellishments
Embellishments can add charm and character to your teacup bird feeder. Consider gluing on decorative buttons, beads, or small tiles. Adding embellishments can enhance the theme of your garden. For a rustic look, use twine or burlap; for a whimsical vibe, try colorful gems or sequins. You could also use natural materials like pinecones or small twigs for a more organic feel. These elements not only look great but also blend seamlessly with the garden environment. Have you thought about attaching a small sign or tag with a witty or welcoming message for the birds? It adds a delightful, personal touch. Remember, the goal is to make your bird feeder both functional and a reflection of your personal style. What unique ideas will you bring to your teacup bird feeder?
Installation Tips
Create a charming garden addition with a DIY teacup bird feeder. Select sturdy teacups and saucers, attach securely with waterproof glue. Hang it in a shaded spot to attract beautiful birds.
Creating a DIY teacup bird feeder is a delightful project, but installing it properly is key to attracting feathered friends. With the right installation tips, you can ensure your feeder is both a safe haven for birds and a charming addition to your garden. Let's dive into choosing the perfect spot and the best way to hang your new creation.
Choosing A Location
Selecting the right location for your teacup bird feeder can make all the difference. Consider areas that are visible from your windows, so you can enjoy watching the birds while sipping your morning coffee. Think about bird safety. Placing the feeder near bushes or trees gives birds a place to hide from predators. Avoid spots too close to windows or busy walkways to prevent bird collisions and disturbances. Also, think about the weather. Position the feeder in a spot that provides some shelter from heavy rain or strong winds. This will help your teacup feeder last longer and keep the bird seed dry.
Hanging The Feeder
Hanging your teacup bird feeder securely ensures it stays in place even during gusty weather. Use a sturdy hook or a piece of wire that can support the weight of the feeder and any visiting birds. If you’re using a tree branch, ensure the branch is strong and healthy. Test it by gently tugging to see if it can handle the load. For hooks attached to structures, make sure they are well-secured and not prone to loosening over time. Consider the height at which you hang your feeder. It should be high enough to deter ground predators but low enough for easy refilling. A height of about five feet off the ground is usually ideal. Have you ever struggled with keeping squirrels away? You might want to install a baffle above or below the feeder to deter these clever intruders. By thoughtfully choosing a location and securely hanging your feeder, you'll create a welcoming spot for birds, and a delightful focal point for your outdoor space. Ready to watch some birds?
Birdseed Selection
Choosing the right birdseed is crucial for your teacup bird feeder project. The type of seed you select will determine which birds visit your garden. By understanding birdseed options, you can attract a variety of feathered friends.
Types Of Seeds
Different seeds attract different types of birds. Sunflower seeds are popular and attract many species. They're easy to find and offer high nutritional value. Millet is another great choice. It draws sparrows, juncos, and doves. Thistle seed is perfect for goldfinches and siskins. It is tiny, so use a feeder with small openings. Cracked corn attracts larger birds like crows and jays. It is affordable and easy to source. Ensure you choose quality seeds for the best results.
Filling The Feeder
Properly filling your teacup feeder ensures it remains inviting. Start by placing the feeder in an accessible spot. Use a spoon or small cup to add the seeds. Fill it to the top but avoid overfilling. This prevents seeds from spilling. Check the feeder regularly and refill when necessary. Keeping it clean and filled will attract more birds. Watch as different species enjoy your efforts.
Maintenance And Care
Ensure your DIY teacup bird feeder lasts with regular cleaning. Check for cracks or damage weekly to keep it safe. Refresh seeds often to attract birds and prevent mold. Proper care makes your bird feeder a charming garden addition.
Creating a DIY teacup bird feeder can be a delightful project that brings a touch of charm to your garden and invites a variety of feathered friends to visit. However, the joy of seeing birds flock to your feeder comes with the responsibility of maintaining it. Proper care ensures that your bird feeder remains a healthy spot for birds to dine and that it lasts through different seasons. Let’s look at some simple steps to keep your teacup bird feeder in top shape.
Cleaning The Feeder
Regular cleaning is essential to prevent mold and bacteria buildup in your feeder. Birds deserve a clean eating space, just like we do. Set a reminder to clean the feeder at least once every two weeks. To clean, gently remove the teacup from its base and wash it with warm, soapy water. Rinse thoroughly to remove any soap residue, which can be harmful to birds. Allow it to air dry completely before refilling it with seeds. Have you noticed any stubborn stains? A little baking soda can work wonders. Sprinkle some onto a damp cloth and scrub gently. Remember, the cleaner the feeder, the happier and healthier the birds will be.
Replacing The Seeds
Fresh seeds are more appetizing for birds and help avoid mold growth. When was the last time you checked the seed supply in your feeder? Aim to replace the seeds every week, especially if you notice they’re getting wet or clumpy. If the feeder looks untouched for days, consider swapping the seeds for a different mix. Different birds are attracted to different seeds. Keep an eye out for sprouting seeds, which indicate moisture presence. Discard these immediately to maintain a healthy feeding environment. Your vigilance ensures that your feathered visitors enjoy their meals and keep coming back for more. Maintaining your DIY teacup bird feeder doesn’t have to be a chore. With these simple steps, you’ll keep the feeder inviting and safe for your avian friends. What other creative projects have you tried in your garden to attract wildlife? Your experiences might inspire others to take up the teacup challenge!
Attracting Birds
Creating a DIY teacup bird feeder is a fun project. It adds charm to your garden and invites birds to visit. Attracting birds requires understanding their needs and preferences. With the right environment, your feeder becomes a favorite spot for local birds.
Creating A Bird-friendly Environment
Birds seek safe and welcoming spaces. Place your feeder near trees or shrubs. These provide shelter and protection. Birds feel secure with easy access to cover. A quiet area away from noise is ideal. Limit disturbances like pets or loud music.
Water sources are essential. Birds need clean water for drinking and bathing. Consider adding a birdbath nearby. Ensure the water stays fresh by changing it regularly.
Understanding Bird Preferences
Different birds have varied food preferences. Research local species to know what they like. Common choices include seeds, nuts, and fruits. Offer a mix to attract a variety of birds. Avoid processed foods or leftovers.
Keep the feeder clean and free of mold. Birds avoid dirty feeders. Regular maintenance ensures health and safety. Use mild soap and water for cleaning. Rinse thoroughly to remove any residue.
Using natural elements in the feeder appeals to birds. Consider adding twigs or leaves. Birds appreciate familiar materials. This makes the feeder inviting and comfortable.
Frequently Asked Questions
How To Make A Bird Feeder Out Of A Teacup?
Glue the teacup to a saucer using waterproof adhesive. Attach a hook or string to the saucer's edge. Fill the cup with birdseed. Hang it in a safe spot for birds. Ensure the feeder is stable and accessible. Enjoy watching the birds visit your creative feeder!
What Is The Easiest Homemade Bird Feeder?
A simple bird feeder can be made using a pine cone, peanut butter, and birdseed. Spread peanut butter over the pine cone, then roll it in birdseed. Hang it outside with a string, and enjoy watching birds visit. This easy project is perfect for beginners and kids.
Why Put A Potato In The Bird Feeder?
Bird enthusiasts put potatoes in feeders to attract birds like starlings and blackbirds. Potatoes provide essential nutrients. Ensure potatoes are cooked and cooled to prevent harm. Avoid using seasonings or oils, as they can be toxic. This simple addition supports diverse bird diets and encourages visits.
What Is The 5 7 9 Rule For Bird Feeders?
The 5 7 9 rule recommends spacing bird feeders 5 feet apart, 7 feet above the ground, and 9 feet from cover. This setup minimizes competition, deters predators, and enhances safety for birds visiting the feeders.
Conclusion
Creating a teacup bird feeder is simple and fun. It adds charm to your garden and invites birds. This craft is affordable and uses items you might already have. Perfect for a weekend project with friends or family. Enjoy watching birds while sipping tea on your porch.
Share your creativity with neighbors and inspire them too. With just a teacup and saucer, your garden becomes lively. Experience nature's beauty right in your backyard. Try it today and bring joy to your outdoor space. Happy crafting and birdwatching!