

Imagine sipping your morning coffee while watching a flurry of colorful birds dance around a feeder you built with your own hands. Sounds delightful, doesn’t it?
Building a bird feeder not only invites nature’s beauty into your backyard, but it also offers a rewarding project that connects you with the natural world. You might think creating a bird feeder requires a lot of skill and expertise, but the truth is, you can do it with just a few simple tools and materials.
This guide will walk you through the process with easy-to-follow plans, ensuring you can craft a feeder that’s both functional and charming. Ready to make your backyard a bird haven and enjoy the serenity and joy it brings? Let’s dive in and discover how you can turn a simple DIY project into a magical experience for both you and your feathered friends.
Materials And Tools
Creating a bird feeder is a fun and rewarding activity. To start, gather the necessary materials and tools. This ensures your project is smooth and enjoyable. Let’s explore what you’ll need.
Essential Materials
Wood is a common choice for bird feeders. It’s durable and easy to work with. You can use pine or cedar. Both are weather-resistant. Plexiglass or plastic is helpful for windows. Birds can see the food inside. Use screws or nails to hold everything together. Glue can provide extra strength.
Necessary Tools
A saw is needed to cut the wood. A handsaw or electric saw will work. A drill helps in making holes for screws. Sandpaper smooths out rough edges. This prevents injuries to birds. A measuring tape ensures precise cuts. A screwdriver tightens screws securely. A hammer is useful for nails.
Optional Add-ons
Consider adding a perch for birds to rest. Use a dowel rod or branch. A roof protects the food from rain. Use shingles or metal sheeting. Paint or varnish can protect the wood. Choose non-toxic options for safety. A hook or chain can hang the feeder from a tree. This keeps it safe from predators.
Design Selection
Building a bird feeder starts with choosing the right design. A good design attracts birds and complements your garden. It balances aesthetics and functionality, ensuring durability.
Choosing The Right Design
The design affects which birds visit your feeder. Consider designs that suit your garden style. Popular choices include tray feeders, tube feeders, and hopper feeders. A tray feeder is simple and open. A tube feeder is sleek and hangs easily. A hopper feeder holds more seed and is sturdy.
Understanding Bird Preferences
Different birds prefer different feeder types. Sparrows like tray feeders. Finches enjoy tube feeders. Larger birds such as cardinals prefer hopper feeders. Knowing local bird species helps in choosing the best design. Observe birds in your area to understand their habits.
Size And Capacity Considerations
Size and capacity are key factors. Larger feeders hold more seed and attract more birds. Small feeders are easier to manage but require frequent refilling. Determine how many birds you want to attract. Consider the space available in your garden. Ensure the feeder is accessible for cleaning and refilling.
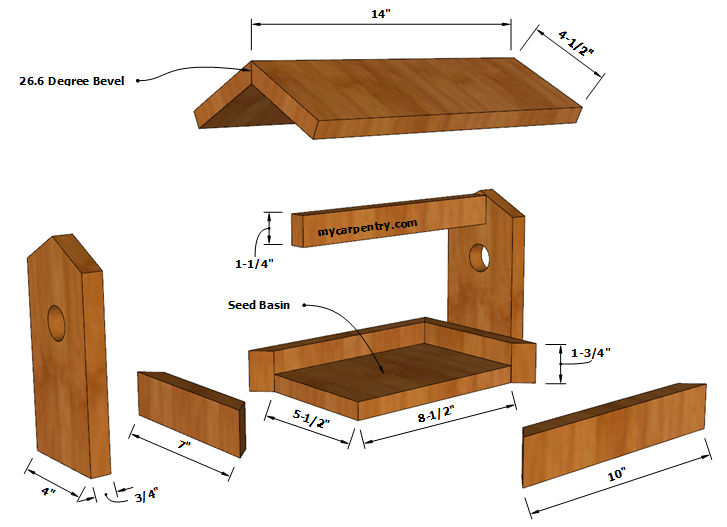
Cutting And Preparing Parts
Crafting a bird feeder requires careful cutting of wooden parts. Measure each piece accurately to ensure a perfect fit. Use a saw to cut the parts and sand edges for smoothness.
Building a bird feeder is a rewarding project that invites nature into your backyard. The most crucial part of this process is cutting and preparing the parts. Getting this right ensures your feeder is both functional and beautiful. Let’s break it down step by step, so you can create something both you and the birds will love.Measuring And Marking
Precision is key when measuring and marking your wood pieces. Use a tape measure and a pencil for accuracy. Mark out each piece clearly. This will prevent any confusion during cutting. Have you ever rushed through this step? It often results in wasted materials. Take your time and double-check your measurements.Cutting Techniques
Choose the right saw for your project. A hand saw works well for small cuts, while a circular saw is best for larger pieces. Ensure your saw blade is sharp for clean cuts. Dull blades can splinter wood, making it unusable. Always wear safety goggles. Keeping your eyes safe should never be an afterthought.Sanding And Smoothing Edges
Once cut, the edges of your wood may be rough. Sanding smooths them out, preventing splinters. Use sandpaper or an electric sander for larger projects. Start with coarse-grit and finish with fine-grit paper. Have you considered how smooth edges can make your feeder look more professional? It’s the little details that elevate your craftsmanship. By focusing on these crucial steps, you enhance both the durability and aesthetics of your bird feeder. What other projects might benefit from this careful attention to detail?Assembling The Feeder
Building a bird feeder can be a rewarding project, especially when you see feathered friends flocking to your creation. Assembling the feeder is an exciting step where all your planning starts to come to life. You may find yourself stepping back to admire your handiwork, feeling a sense of accomplishment as each piece finds its place. But how do you ensure that every part fits seamlessly? Let’s dive into the process, starting with the base construction, moving onto attaching walls and roofs, and finally securing those joints.
Base Construction
The base is the foundation of your bird feeder, so it needs to be sturdy. Consider using a solid piece of wood or durable plastic. You want to ensure it can withstand outdoor elements and the weight of birds landing on it. A square or rectangular shape is common, but don’t be afraid to get creative with shapes.
Think about the base size. A larger base can hold more seed and attract more birds. However, it also needs to be manageable for you to handle and mount. Secure the base to a post or another structure with screws or nails for stability.
Attaching Walls And Roof
With the base ready, it’s time to add the walls. You can use wood, plastic, or even metal sheets. Ensure they are tall enough to contain the birdseed but not too high that birds struggle to reach inside. Drill or nail the walls securely to the base.
Next is the roof. It’s crucial for keeping the seeds dry and protecting them from the elements. You might choose a sloped design to allow rainwater to run off easily. Attach it securely, ensuring it covers the feeder adequately.
Securing Joints
Now, let’s make sure everything stays together. Secure the joints with screws, nails, or wood glue. This step is vital for the feeder’s longevity, especially if you’re in a windy area. Reinforce each corner to prevent any wobbling.
Test the feeder’s stability by gently shaking it. It should withstand minor movements without coming apart. Consider using weatherproofing materials to protect joints from moisture and rot. This extra step can extend the life of your feeder significantly.
As you assemble your feeder, ask yourself: How would you feel if a bird feeder you built lasted for years? Your meticulous assembly process can lead to a durable structure that birds, and you, will enjoy for seasons to come.
Adding Feeding Features
Creating a bird feeder can be a rewarding project, especially when you focus on adding feeding features that attract a variety of feathered friends. These features are essential for ensuring birds can easily access food and feel comfortable while feeding. Whether you’re an experienced bird watcher or a beginner, enhancing your bird feeder with thoughtful additions can make all the difference. Let’s delve into the specifics of adding feeding features that truly cater to the needs of your avian visitors.
Creating Feeding Ports
Feeding ports are crucial for allowing birds to access the seeds inside the feeder. Think about the size and shape of the ports, as they should match the types of birds you want to attract. Smaller ports work well for tiny birds like finches, while larger openings cater to bigger birds such as cardinals.
To create feeding ports, use a drill to make holes in the feeder’s body. Consider using a removable cover for the ports to protect seeds from the weather. Have you ever noticed how birds navigate different feeder designs? It’s fascinating how they adapt to various structures.
Installing Perches
Perches are vital for providing birds a place to rest while they feed. Choose materials that are durable and weather-resistant, like metal or treated wood. Ensure the perches are positioned close to feeding ports, making it easy for birds to reach seeds.
Think about adding multiple perches to accommodate several birds at once. Have you ever watched as birds jockey for position on a feeder? Installing sturdy perches can reduce competition and make your feeder more appealing.
Incorporating A Seed Tray
A seed tray collects fallen seeds, minimizing waste and attracting ground-feeding birds. Attach a tray beneath the feeder to catch any spilled seeds. Ensure the tray is easy to clean to prevent mold and bacteria buildup.
Consider the size of the tray based on the number of birds you expect to visit. Have you noticed how some birds prefer to feed on the ground? A seed tray can be a welcoming feature for these ground feeders, enriching your birdwatching experience.
By thoughtfully adding these feeding features, you create a welcoming environment that invites a diverse array of birds to your backyard. What kind of birds are you hoping to attract with your feeder plans?
Finishing Touches
Crafting bird feeder plans requires attention to detail. Start by selecting durable materials for longevity. Ensure openings allow easy bird access while preventing larger pests.
Finishing touches can transform your bird feeder into a masterpiece. This step is crucial to ensure longevity and beauty. A few simple enhancements can make a big difference. Let’s explore how to give your bird feeder the perfect finish.Applying Weatherproof Coating
Bird feeders face harsh weather conditions. Rain, sun, and wind can damage them. Applying a weatherproof coating protects the wood. Use a clear sealant for the best results. It keeps the feeder looking new and extends its life. Ensure even coverage for maximum protection.Decorative Elements
Decorative elements add charm to your bird feeder. Paint can brighten the design and attract birds. Choose colors that blend with nature. Adding small wooden shapes offers a playful touch. Use non-toxic materials to keep birds safe. Get creative. Let your personality shine through the design.Ensuring Stability
Stability is vital for a functional bird feeder. A wobbly feeder can scare birds away. Check all joints and connections for tightness. Reinforce weak spots with extra nails or glue. Consider adding a weighted base for windy areas. Stability ensures your feeder stays in place and attracts more birds.Mounting And Placement
Creating a bird feeder requires careful mounting and placement to attract birds safely. Position it near trees or bushes for shelter. Secure the feeder at a height that deters predators and provides easy access for birds.
Mounting and placing your bird feeder correctly is crucial. It ensures birds visit your feeder often. Correct placement offers safety and accessibility. This section will guide you through the best practices.Choosing The Best Location
Select a location visible from your window. This lets you enjoy bird watching. Ensure the spot has some shade. Birds prefer feeders not in direct sunlight. Avoid placing it near busy areas. Too much noise can scare birds away. Choose a spot near trees or shrubs. This gives birds a place to perch and feel safe.Mounting Techniques
Choose a sturdy pole or hook for mounting. Ensure it can hold the feeder’s weight. Attach the feeder securely to prevent tipping. Use weather-resistant materials for durability. Consider a baffle to deter squirrels. This keeps food reserved for the birds.Safety And Accessibility
Ensure the feeder is high enough to avoid predators. At least five feet from the ground is ideal. Keep the area around the feeder clean. Fallen seeds can attract unwanted pests. Make sure the feeder is easy to reach. You’ll need to refill and clean it regularly. Keep it at a comfortable height for maintenance.
Maintenance Tips
Maintaining a bird feeder is essential for attracting healthy birds. Regular upkeep ensures the feeder stays clean and safe. It also keeps the birds coming back. Follow these simple tips to keep your bird feeder in top condition.
Regular Cleaning
Bird feeders need cleaning often to prevent mold and diseases. Use mild soap and warm water for cleaning. Rinse thoroughly to remove any soap residue. Check for stuck seeds or dirt in corners. A small brush helps clean tight spots. Clean feeders every two weeks.
Refilling Strategies
Refill feeders before they are completely empty. This keeps birds visiting your yard. Choose a consistent schedule to refill. Mornings are best for refilling. Check for damp seeds before adding more. Remove wet seeds to avoid mold growth. Consider using a funnel for easy refilling.
Seasonal Adjustments
Adjust your feeder based on the season. In winter, provide high-energy food like suet. Birds need extra calories to stay warm. Summer requires lighter food options. Offer seeds and fruit during warmer months. Change the placement of feeders to avoid direct sun. This prevents seed spoilage.

Frequently Asked Questions
What Is The 5 7 9 Rule For Bird Feeders?
The 5-7-9 rule for bird feeders suggests spacing feeders 5 feet apart, hanging them 7 feet above ground, and ensuring a 9-inch clearance for perches. This setup helps prevent overcrowding and reduces the risk of predator attacks, ensuring a safe and inviting environment for birds.
How To Build A Bird Feeder Step By Step?
Gather materials like a wooden plank, nails, and a saw. Cut the plank into pieces. Assemble the pieces into a box shape. Add a roof to protect from rain. Drill holes for easy hanging. Fill with birdseed. Hang it in a tree or garden.
Enjoy watching birds visit!
Why Put A Potato In The Bird Feeder?
Putting a potato in a bird feeder provides birds with essential nutrients and energy. It attracts various bird species and offers them a natural food source. Potatoes are rich in carbohydrates and can be a beneficial supplement to their regular diet, especially during colder months.
Is It Cheaper To Make Your Own Bird Food?
Making your own bird food can be cheaper. It depends on the ingredients and quantities you choose. Buying in bulk and using kitchen scraps can save money. Homemade mixes also allow customization for specific bird species. Always compare costs with commercial bird food options.
Conclusion
Building your bird feeder can be a fun project. It invites birds to your garden. You get to watch them and enjoy nature. Plus, it’s a creative way to recycle materials. This project suits all ages and skill levels. So, gather your tools and start building today.
Remember, every feeder helps birds thrive. Your efforts make a difference. Enjoy the process and the beautiful visitors it brings. Happy building and birdwatching!


