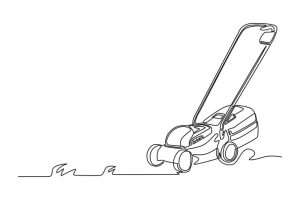
Imagine having the ability to capture everyday objects with just a pencil and paper. If you’ve ever wanted to transform your artistic skills or simply impress your friends, drawing a lawn mower can be a fun and rewarding challenge.
Whether you’re a beginner or someone looking to refine your skills, this guide is for you. You’ll discover simple techniques and tips that will make the process easy and enjoyable. As you follow along, you’ll not only learn how to create a realistic drawing but also unlock your creativity.
Get ready to dive into this exciting world of drawing, where your imagination is the only limit.
Gathering Materials
Before you dive into drawing a lawn mower, gathering the right materials is crucial. Having the correct supplies can make the difference between a frustrating experience and a joyful one. Let’s explore what you’ll need to get started.
Essential Supplies
- Sketchbook or Drawing Paper:Choose a medium-sized sketchbook for ample space to capture details. If you’re using loose paper, ensure it’s thick enough to withstand erasing.
- Pencils:A set of pencils ranging from hard (H) to soft (B) will allow you to create varying shades and textures.
- Eraser:A soft eraser is essential for correcting mistakes without damaging the paper.
- Ruler:This will help you keep proportions accurate, especially when drawing straight lines for the mower’s body.
- Reference Image:Have a clear picture of a lawn mower handy. This will guide you in capturing authentic details.
Choosing The Right Sketching Tools
Choosing the right sketching tools can enhance your drawing experience. Have you ever tried drawing with a pencil that just doesn’t feel right in your hand? It can be surprisingly frustrating.
- Pencil Types:Opt for pencils that suit your grip and pressure. Some prefer softer pencils for shading, while others find hard pencils ideal for crisp outlines.
- Eraser Types:Consider a kneaded eraser for delicate corrections or a vinyl eraser for broader strokes.
- Extra Tools:A blending stump can help you achieve smooth transitions in shading, perfect for detailing the mower’s curves.
Think about how these tools will affect your drawing. Will a softer pencil help you capture the intricate details of the engine? Or will a sturdy ruler keep your lines perfectly straight?
Gathering materials thoughtfully ensures you’re prepared to translate your vision onto paper. It’s the foundation of a drawing journey that can be both rewarding and creatively fulfilling.
Credit: www.dreamstime.com
Basic Shapes And Structure
Drawing a lawn mower might seem like a challenging task, but breaking it down into basic shapes and structure makes it manageable. Think of it as a puzzle where each piece has its place. By identifying and sketching these fundamental elements, you can transform a complex object into an approachable drawing project.
Drawing The Main Body
Start with a rectangle for the main body of the lawn mower. This shape forms the base where all other components connect. Keep it proportionate to ensure the overall look remains balanced.
Consider the perspective you want, whether it’s a side view or a top-down view. A simple rectangle can give you the foundation to build upon. You might be surprised how this shape defines the mower’s structure.
Use light pencil strokes at first. It allows you to adjust proportions easily. Do you remember the last time you drew something and wished you could erase a dark line? Light strokes are your safety net.
Adding Wheels And Handles
Next, add circles on either side of the rectangle to represent the wheels. Wheels are essential for the mobility of the mower, so make sure they are evenly sized and aligned.
The position of the wheels can suggest if the mower is moving or stationary. Experiment with slight tilts to add dynamic to your drawing. Have you ever tilted a wheel just a bit to see the effect? Try it here.
Now, sketch the handles extending from the main body. Use elongated rectangles or slightly curved lines to capture their shape. Handles are crucial as they define how the mower is operated.
Ensure the handles are proportionate to the main body. They should be long enough to suggest usability. What do you think makes a lawn mower look more realistic? Sometimes, it’s all about the details like these.
Detailing The Lawn Mower
Discover the art of drawing a lawn mower with simple steps. Begin by sketching the basic outline. Add details like wheels and blades for a realistic touch.
Detailing the lawn mower is where your drawing will truly come to life. This part of the process allows you to add personality and realism to your sketch. When you focus on the details, you engage your creativity and make your drawing stand out.Designing The Engine Area
Start with the engine, the heart of your lawn mower. Capture its essence with simple shapes like rectangles and circles. Remember, the engine often appears as a blocky structure on top of the mower. Add the essential components like the air filter and exhaust pipe. These elements are usually placed on the side or top. Look at a real lawn mower or images for inspiration. Focus on the pulley and belts if visible. These parts can add complexity to your drawing, making it more interesting. Small circles and lines can represent these features effectively.Enhancing With Additional Features
Think about the wheels. They aren’t just circles; they have treads and bolts. Adding these details can transform a simple circle into a realistic wheel. Consider the handle and its grip. Is it cushioned? Textured? Adding these details can make your lawn mower drawing feel tangible. Include safety features, like the stop bar or control levers. These are vital for a realistic depiction. Every small detail counts, enhancing the authenticity of your drawing. Do you want to add some personal flair? Maybe a decal or brand logo? These creative touches can personalize your lawn mower. What other unique features can you include to make your drawing truly yours?
Credit: museprintables.com
Refining And Adjusting
Refining and adjusting your lawn mower drawing adds depth and accuracy. During this stage, focus on polishing your sketch. Pay attention to the details and ensure everything looks balanced. This process transforms your rough draft into a detailed piece of art.
Improving Proportions
Check the mower’s body compared to its wheels. The wheels should be proportional to the body size. Compare your drawing with a real mower image. Adjust any parts that seem off. A ruler can help maintain straight lines and correct proportions. Remember, symmetry is key for a realistic look.
Perfecting Lines And Curves
Examine the lines and curves of your drawing. Use a fine-tip pencil for smoother curves. Ensure the handle, wheels, and body lines are clear and precise. Erase any wobbly or uneven lines. Crisp lines make the mower appear more lifelike. Rework areas until each line looks intentional and clean.
Shading And Texturing
Enhance your lawn mower drawing by focusing on shading and texturing. Use light and dark tones to create depth. Add texture to represent metallic surfaces and grass details for a realistic look.
Shading and texturing breathe life into your lawn mower drawing. They add depth and make it look more realistic. By mastering these techniques, you can transform a simple sketch into a detailed masterpiece. Let’s explore how shadows and textures can elevate your artwork.Creating Depth With Shadows
Shadows are vital for depth. Use darker shades to show areas where light is blocked. Think about where the light source is. Shadows should be on the opposite side. This creates a three-dimensional effect. Use soft strokes for gradual shadow transitions. This keeps it natural. Avoid harsh lines; they make shadows look unrealistic.Adding Realistic Textures
Textures give character. For metal parts, use smooth shading. This mimics shiny surfaces. Grass texture is different. Use short, quick strokes. It creates a rough look. Pay attention to tire treads. They need detailed lines. Texture adds authenticity to your drawing.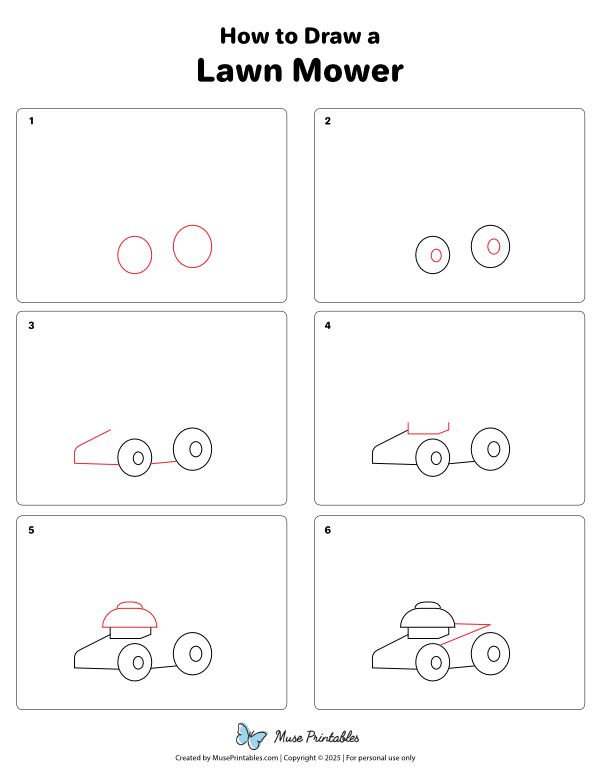
Credit: museprintables.com
Final Touches
Add final touches by detailing the lawn mower’s blades and handles. Enhance realism with shading and texture. Ensure proportions are accurate for a polished look.
Adding the final touches to your lawn mower drawing is like the cherry on top of a sundae. It’s where your creativity flows freely, transforming a simple sketch into a vibrant piece of art. Paying attention to these details can make your drawing stand out, capturing the essence of a real lawn mower.Evaluating The Composition
Take a step back and look at your drawing from a distance. This gives you a fresh perspective, helping you spot any glaring issues or areas that need enhancement. Consider the proportions and balance of the mower’s parts. Does the handle look too short or the wheels too large? Comparing your drawing with a reference image can offer valuable insights. It’s like having a silent mentor guiding you.Making Final Adjustments
Fine-tune any lines that seem off or too light. A bolder outline can bring clarity and definition to the mower’s structure. Add shading to give depth, making the mower appear three-dimensional. Think about where the light hits and where shadows might fall. Don’t forget to highlight key features like the engine or the blades. A bit of detailing here can make your drawing pop. You may also want to add textures to different parts. For example, a rough texture for the tires or a smooth finish for the mower’s body. Finally, remember that perfection isn’t the goal; expression is. How does your drawing make you feel? Does it reflect the essence of what you envisioned? These final touches are your signature, the personal flair that transforms a simple sketch into a unique masterpiece.Frequently Asked Questions
How To Draw Grass In An Easy Way?
To draw grass easily, use short, vertical strokes with a pencil or pen. Vary stroke lengths for a natural look. Add shading for depth and texture. Experiment with different shades of green for realism. Practice regularly to improve your technique and achieve lifelike grass.
How To Draw Water 💦?
To draw water, begin by sketching wavy lines to represent movement. Add light reflections for realism. Use varying shades of blue to create depth. Keep your strokes fluid to mimic water’s natural flow. Finish with highlights to enhance the water’s shimmering effect.
How To Draw Leaves Easily For Beginners?
Start by drawing a simple leaf shape. Add veins with curved lines. Use light strokes for shading. Practice regularly to improve technique. Experiment with different leaf types for variety.
How To Do A Lawn Mower Pull?
To pull a lawn mower, grip the handle firmly. Ensure the mower is on a flat surface. Pull the starter cord swiftly and steadily. Keep your stance balanced for safety. Repeat if necessary until the engine starts.
Conclusion
Drawing a lawn mower is simpler than you think. Start with basic shapes. Add details like wheels and handle. Use bold lines for depth. Focus on small parts for realism. Practice often. Your skills will improve. Keep experimenting with different styles.
Share your drawings with friends. They’ll appreciate your creativity. Enjoy the process and have fun. Drawing should be relaxing. Remember, every artist was once a beginner. Use this guide as a starting point. Soon, you’ll create stunning lawn mower drawings.
Let your imagination lead the way.