Imagine stepping into your garden and hearing the gentle hum of bees, busy at work. Not just any bees, but mason bees—nature's efficient pollinators.
Did you know that mason bees can pollinate up to 100 times more plants than honeybees? Creating a welcoming home for these little powerhouses in your backyard can transform your garden into a flourishing haven. The best part? It's simpler than you think.
By the end of this article, you’ll learn how to make a mason bee house that not only supports your garden but also contributes to the environment. Curious about how you can become a part of this eco-friendly movement? Keep reading, and you'll discover the step-by-step process to attract these beneficial bees and enhance your garden's vitality.

Materials Needed
Creating a mason bee house is a simple and rewarding project. These little pollinators are crucial for gardens. Before starting, gather all necessary materials. This ensures a smooth building process. Having the right items also helps bees feel at home. Below are the essential materials for your bee house.
Wooden Block
A wooden block serves as the house's main structure. Select untreated wood to keep bees safe. Cedar and pine are popular choices. Choose a block that is at least 4 inches thick.
Drill And Bits
A drill is essential for making nesting holes. Use bits that are 5/16 inch wide. This size is perfect for mason bee nests. Ensure the drill bits are sharp for clean holes.
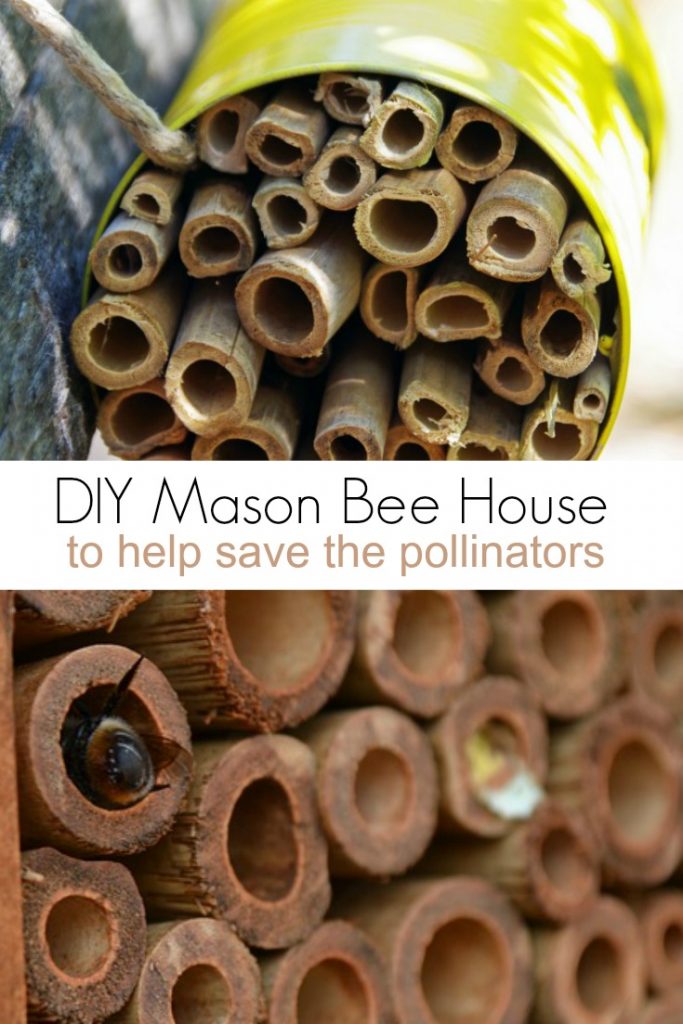
Paper Straws Or Liners
Paper straws protect the nesting holes. They make cleaning easier. Choose biodegradable options to support the environment. Cut them to match the hole's depth.
Roof Material
Protect the house from rain with a roof. Use waterproof materials like metal or plastic. This keeps the interior dry. A sloped roof ensures water runs off.
Mounting Supplies
Secure the house with mounting materials. Screws or nails work well. Choose rust-resistant options for durability. Place the house facing the morning sun.
Finishing Supplies
Optional finishing supplies enhance the bee house's look. Consider natural wood stains. Avoid toxic paints or chemicals. This keeps the bees healthy.
Choosing The Right Location
Selecting the ideal spot for a mason bee house is crucial for their success. Opt for a sunny location with morning sunlight. Ensure it's sheltered from rain and wind, near flowers for easy access to pollen.
Choosing the right location for your mason bee house is crucial to ensure these beneficial pollinators thrive and make your garden flourish. Mason bees are solitary creatures that prefer quiet, safe places. The spot you choose can significantly impact the success of your bee house. Let's explore how to find that ideal location to attract and support these industrious bees.
Finding A Sunny Spot
Mason bees are sun-loving insects. They need warmth to become active and start pollinating. Choose a location that receives morning sun and stays warm throughout the day. This helps the bees get up early and work hard pollinating your plants.
Avoiding Windy Areas
Wind can deter mason bees from nesting and flying. Select a location sheltered from strong winds. You can use a hedge, fence, or wall to break the wind. This creates a calm environment where your bees feel safe and secure.
Proximity To Flowers
Mason bees need access to pollen and nectar. Place the bee house near flowering plants, ensuring your bees have plenty of resources. This not only supports their needs but also encourages more pollination in your garden.
Securing Against Predators
Protect your mason bees from predators like birds and rodents. Position the bee house at least three feet off the ground. Ensure it's not easily accessible to curious wildlife. A simple height adjustment can make a big difference in safeguarding your bees.
Ensuring Accessibility
Place your mason bee house where you can easily monitor and maintain it. Regular checks are essential to ensure the bees are thriving and the house is in good condition. Being able to access the house easily makes caring for your bees much more manageable. Choosing the right location is more than just finding a spot in your garden. It's about creating a welcoming environment for mason bees. What could be more rewarding than seeing your garden buzz with activity and life?
Building The Frame
Creating a mason bee house starts with a sturdy frame. This frame forms the backbone of your bee sanctuary. It must withstand the outdoor elements and provide a safe haven for bees. Building the frame requires precision and attention to detail.
Choosing The Right Materials
Wood is a popular choice for bee house frames. It is durable and easy to work with. Select untreated wood to keep the environment safe for the bees. Cedar and pine are excellent options due to their natural resistance to decay.
Measuring And Cutting The Wood
Accurate measurements ensure a well-fitting frame. Use a ruler or measuring tape for precise dimensions. Cut the wood pieces carefully using a saw. Aim for straight edges to achieve a snug fit.
Assembling The Frame
Start by laying out the cut pieces. Make sure the ends align perfectly. Use wood screws to join the pieces firmly. A drill can help in making precise holes for the screws. Tighten each screw securely for a solid structure.
Ensuring Stability
Check the frame for any wobbly parts. Reinforce weak spots with additional screws if needed. Stability is crucial for protecting the bees from strong winds. A stable frame ensures the longevity of your bee house.

Creating Nesting Tubes
Creating nesting tubes is a crucial step in building a mason bee house. These tubes provide a safe space for bees to lay their eggs. They help in nurturing the next generation of pollinators. Using the right materials and techniques ensures a successful habitat.
Choosing The Right Materials
Opt for paper or natural reeds for nesting tubes. These materials are breathable and safe for the bees. Avoid plastic or metal as they trap moisture. Bees prefer tubes with a smooth interior. This prevents damage to their delicate wings.
Determining Tube Size
Tube size plays a key role in attracting mason bees. Aim for a diameter between 6 and 10 millimeters. This size suits mason bees perfectly. The length should be around 6 inches. It offers enough space for bee larvae to develop.
Cutting And Preparing Tubes
Cut tubes to the desired length using scissors or a sharp knife. Ensure clean cuts to avoid ragged edges. This keeps the tubes safe for bees. If using reeds, smooth out any rough spots. Use sandpaper for a gentle finish.
Assembling The Tubes
Bundle tubes together with a piece of string or wire. Secure them tightly to avoid shifting. Arrange tubes horizontally in the bee house. This mimics the natural nesting environment. Ensure tubes are slightly tilted to prevent water collection.
Placement And Maintenance
Place the bee house in a sunny, sheltered spot. This attracts bees and protects tubes from rain. Regularly check and replace damaged tubes. This maintains a healthy bee habitat and encourages continued nesting.
Assembly Process
Crafting a mason bee house involves gathering materials like wood blocks and hollow tubes. Drill holes in the wood, ensuring they're smooth and deep enough for bees. Arrange the tubes in a box or frame, providing shelter and protection for the bees.
Creating a mason bee house is a fulfilling and eco-friendly project. The assembly process is where it all comes together, transforming simple materials into a welcoming habitat for these beneficial pollinators. It's easier than you might think, and the rewards are many—not just for your garden but for the environment as a whole. So, let's dive in and get started on building a cozy bee house that you can be proud of.
Gather Your Materials
Before you begin, ensure you have all the necessary materials at hand. You'll need untreated wood, a drill, paper straws, and a waterproof roof. Using untreated wood is vital as it ensures a safe environment for the bees.
Cut The Wood
Cut the wood into pieces for the back, sides, roof, and bottom of the house. The back should be the largest piece, providing a solid foundation for the structure. The sides and roof will protect the bees from the elements.
Drill Nesting Holes
Drill holes into the wood, ensuring they are about 6 inches deep and 5/16 inches wide. This size is ideal for mason bees to nest comfortably. Space each hole about ¾ inch apart to give the bees plenty of room.
Assemble The Structure
Use screws to attach the sides and bottom to the back, forming a box shape. Ensure the edges align perfectly to create a snug fit. The roof should slant slightly to allow rainwater to flow off easily.
Insert The Paper Straws
Gently insert paper straws into the drilled holes. These straws can be easily replaced each season, preventing disease buildup. They provide a clean, safe environment for the bees to lay their eggs.
Secure The Roof
Attach the roof securely, ensuring it overhangs the front of the house. This overhang protects the nesting holes from rain. A waterproof roof is essential to keep the interior dry and habitable.
Choose The Perfect Location
Find a sunny spot in your garden, facing the house towards the morning sun. The warmth will attract the bees and help them thrive. Secure the house at least three feet above the ground to keep it safe from predators. Are you ready to witness nature's wonders in your backyard? Building a mason bee house not only supports these vital pollinators but also enriches your gardening experience. What new life will you welcome into your garden this season?
Adding Protective Elements
Making a mason bee house is a rewarding project. But to ensure its success, adding protective elements is crucial. Protection keeps bees safe and increases their chances of thriving. Let's explore how to add these important features.
Shielding From Rain
Rain can damage bee houses. Use a slanted roof to protect them. A sloped roof directs water away, keeping the bees dry. Consider using water-resistant materials. These can be wood sealants or waterproof paints. They add an extra layer of protection against moisture.
Guarding Against Predators
Predators can harm mason bees. Install a wire mesh over the entrance. This prevents large predators from entering. Make sure the mesh has small gaps. Bees can pass through, but predators cannot.
Providing Insulation
Extreme temperatures affect bee health. Insulating the house helps maintain a stable environment. Use natural materials like straw or hay. They provide warmth in cold weather. In hot climates, place the house in a shaded area. This helps keep it cool during the day.
Ensuring Proper Ventilation
Ventilation is vital for bee health. Drill small holes in the house for airflow. This prevents mold and keeps the environment healthy. Ensure these holes are not too large. Bees need protection from drafts and predators.
Maintenance Tips
Maintaining a mason bee house ensures your bees thrive and stay healthy. Regular upkeep can increase the lifespan of your bee house. Follow these simple tips for the best results.
Inspect The Bee House Regularly
Check your bee house once a week. Look for signs of damage or wear. Ensure the nesting tubes are clean and clear. Regular inspections help catch problems early.
Clean The Nesting Tubes
Cleaning is crucial for bee health. Remove debris and old cocoons from the tubes. Use a small brush or pipe cleaner. Clean tubes prevent disease and parasites.
Replace Damaged Parts
Replace broken or worn parts immediately. Use quality materials for durability. This keeps the bee house safe and secure. Regular replacements ensure a healthy environment.
Protect From Predators
Predators can harm your bees. Use a wire mesh to guard the entrance. This deters birds and other threats. Protection is key to bee safety.
Monitor For Mold And Mildew
Mold can harm bees. Keep the bee house dry. Provide proper ventilation. If mold appears, clean it immediately.
Store During Off-season
Store your bee house in a dry place during winter. This protects it from harsh weather. Proper storage extends its lifespan. A well-maintained house welcomes bees back each spring.
Monitoring Bee Activity
Once you've built your mason bee house, observing bee activity is essential. It ensures the health and productivity of your bee residents. By monitoring, you gain insights into their habits and needs. It's a rewarding experience for any bee enthusiast.
Inspecting Nesting Tubes
Check the nesting tubes regularly. Look for signs of occupancy, such as sealed ends. This indicates that bees have successfully laid eggs. Empty tubes suggest they are yet to be used.
Identifying Pollen Deposits
Monitor the presence of pollen deposits near the entrance. Bees carry pollen to feed their larvae. Pollen is a sign of active nesting. It means your bees are thriving.
Observing Bee Behavior
Watch how bees interact with the house. Note if they enter and exit frequently. Frequent visits suggest a healthy population. Minimal activity might indicate issues.
Recording Seasonal Changes
Keep track of bee activity across seasons. Bees are more active in spring and summer. Reduced activity in fall and winter is normal. Understanding these patterns aids in proper care.
Troubleshooting Common Issues
Building a mason bee house can be simple, yet challenges may arise. Problems like choosing the right materials or location are common. Ensure holes are the correct size for bees and keep the house dry to prevent mold.
Building a mason bee house can be a rewarding project, but sometimes things don't go as planned. If your bee house isn't attracting bees or maintaining them, it’s important to troubleshoot these issues. Addressing common problems can ensure your bee house thrives and supports these essential pollinators.
1. Incorrect Location
Placing your bee house in the wrong spot can deter bees. Mason bees prefer a sunny location. Ensure the house is facing south or southeast to catch the morning sun. Avoid shady or damp areas. Bees need warmth to stay active.
2. Wrong Materials
The materials you use can impact bee attraction. Use untreated wood or bamboo. Plastic or metal can create a too-hot environment. Bees prefer natural materials that regulate temperature effectively.
3. Nesting Holes Are Too Large Or Small
Size matters for mason bees. They thrive in nesting holes about 5/16 inch in diameter. Too large or too small, and bees might avoid them. Measure carefully and adjust as necessary.
4. Poor Maintenance
Neglecting maintenance can lead to problems. Clean the house annually to prevent disease. Old nests can harbor parasites. Regular maintenance keeps the bee environment healthy.
5. Predators And Pests
Predators can scare bees away. Birds might peck at your bee house. Use a wire mesh to protect the entrance. Keep an eye out for wasps and ants too, which can invade the nests.
6. Lack Of Nearby Pollen Sources
Bees need pollen sources close by. Plant flowers or shrubs that bloom in early spring. Consider native plants to support local bee populations. Are your surroundings bee-friendly enough? By addressing these issues, your mason bee house can become a buzzing success. Engage with the process and observe your bee house regularly. This hands-on approach will teach you more than any manual could. How will you adapt your approach to support these vital pollinators?
Frequently Asked Questions
How To Build A Simple Mason Bee House?
To build a mason bee house, use a wooden box with drilled holes. Ensure holes are 5-8 inches deep, 5/16 inches wide. Place in a sunny, sheltered spot. Use paper liners for easy cleaning. Attract bees by adding mud nearby.
Regularly maintain for longevity and bee health.
How Deep Do Mason Bee Houses Need To Be?
Mason bee houses should be 6 to 8 inches deep. This depth provides enough space for nesting. Ensure the diameter of the holes is 5/16 inch for optimal bee habitation. Proper depth and size encourage mason bees to thrive and pollinate effectively.
What Is The Best Wood For A Mason Bee House?
Cedar is the best wood for a mason bee house. It resists rot and offers natural insulation. Avoid treated woods, as chemicals can harm bees. Sustainable and untreated woods ensure a healthy environment for mason bees. Keep wood thickness around 2 inches for durability.
How To Attract Mason Bees To A Bee House?
Place the bee house in a sunny location, sheltered from rain and wind. Use nesting tubes or blocks with proper dimensions. Provide a nearby source of mud for nesting material. Ensure the area has blooming plants for pollen and nectar.
Clean and replace nesting materials annually to maintain a healthy environment.
Conclusion
Creating a mason bee house is simple and rewarding. Bees help gardens thrive. Follow easy steps to build your own bee haven. Use natural materials for a safe environment. Keep it in a sunny spot for best results. Soon, you'll see bees buzzing around, pollinating flowers.
This boosts plant growth and beauty in your garden. Enjoy watching nature work its magic. Share your bee house story with friends and family. Encourage others to support local pollinators. Every small step makes a big difference. Happy bee keeping!